Trustpilot
Use a Trustpilot channel to send Service Review and Product Review invitations to your audience directly from an Orbit campaign. Orbit connects to Trustpilot's own email API, so invitations use Trustpilot's templates and star-rating widget, and any reviews your customers submit appear on your Trustpilot profile.
Before you begin
To set up a Trustpilot channel, you need:
- Q3 2026 or later of your Apteco software, including PeopleStage and the FastStats Email Response Gatherer
- An Orbit administrator account with permission to configure the Campaigning Channel Editor
- Admin access to your organisation's Trustpilot Business account
- A Trustpilot application with an API key and secret, created under Integrations > Developers > APIs
- Your Trustpilot Business Unit name
Creating your Trustpilot channel
To create a Trustpilot channel:
- Select your avatar in the top-right corner, then select Application Settings.
- Select Campaigning Channel Editor, then go to the folder where you want to create the channel.
-
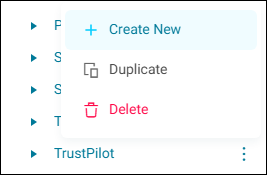
Open the folder's option menu, then select Create New.
Tip
If a Trustpilot folder doesn't already exist, create one first to keep your channel organised.
-
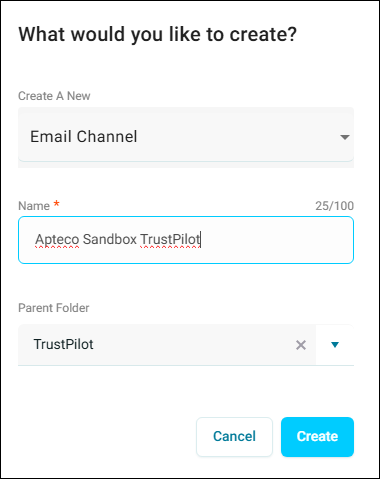
Select Email Channel from the drop-down list, give the channel a name, and choose a parent folder.
-
Select Create.
-
Select your new channel, then select Edit. You configure it on the Basic Details and Parameters tabs.

Setting the basic details
Open the Basic Details tab.
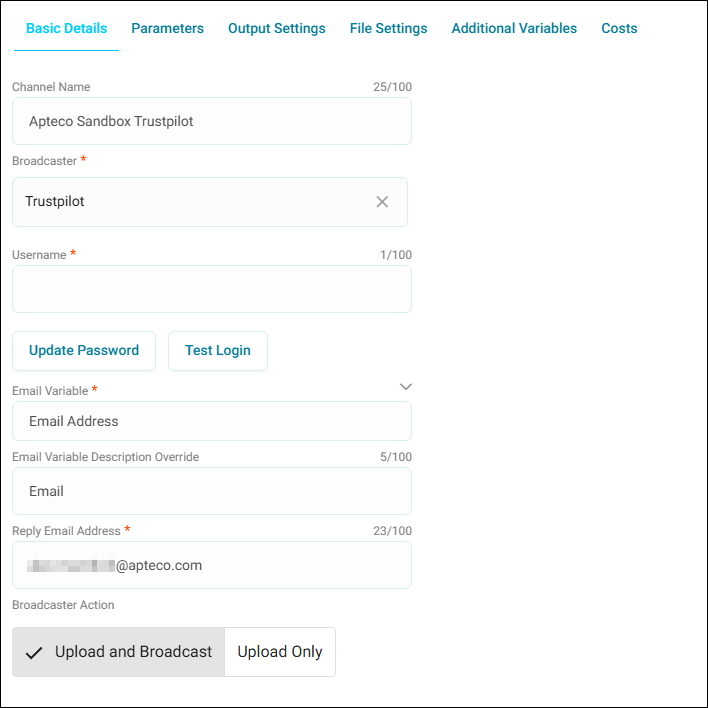
To configure the basic details:
- Set Broadcaster to Trustpilot.
-
Enter any value in Username and Password.
Note
Trustpilot authenticates using the API key and secret you add on the Parameters tab, not this username and password. The fields are required, but their values aren't used. A space or a full stop works.
-
Set Email Variable to the email address variable from your system.
- Set Email Variable Description Override to
Email. -
Set Reply Email Address to the address Trustpilot should use if a customer replies to an invitation.
Tip
Use a shared mailbox or administrator account here rather than a personal address, so replies aren't missed.
-
Select Upload and Broadcast.
Finding your Trustpilot account details
The Parameters tab needs several values from your Trustpilot Business account. To find them:
-
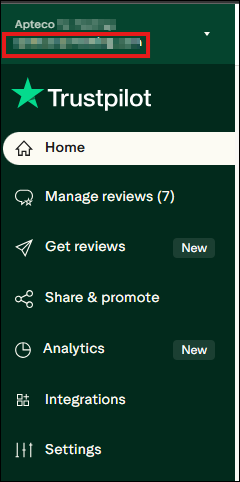
Note your Business Unit, shown at the top of the left-hand navigation in Trustpilot.
-
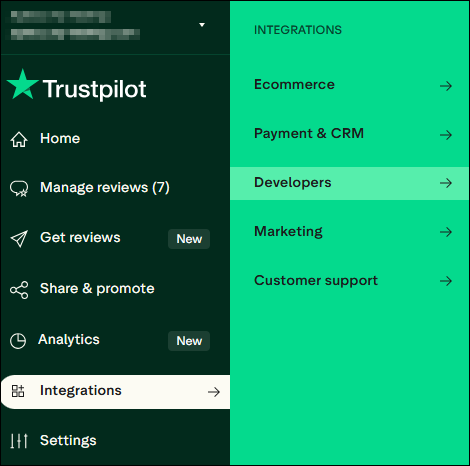
Go to Integrations.
-
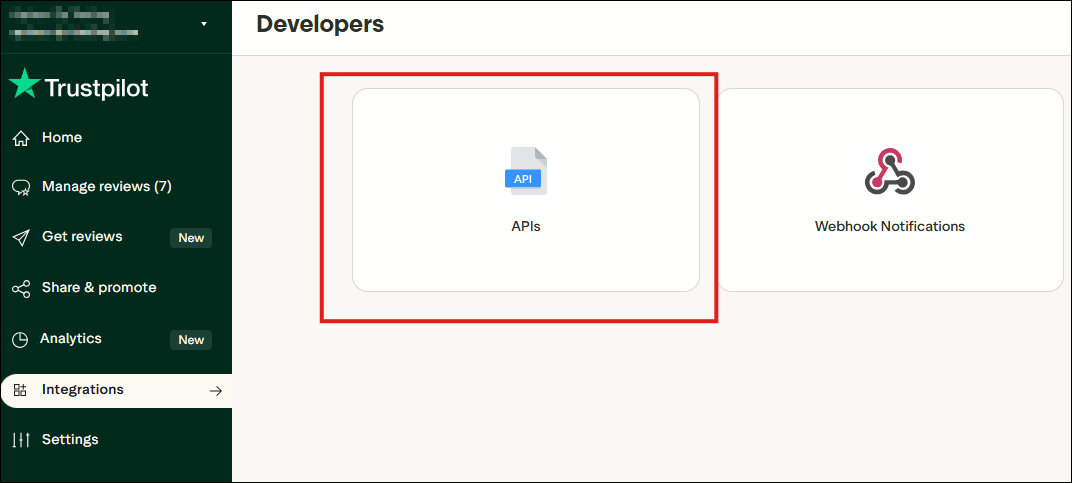
Select Developers > APIs.
-
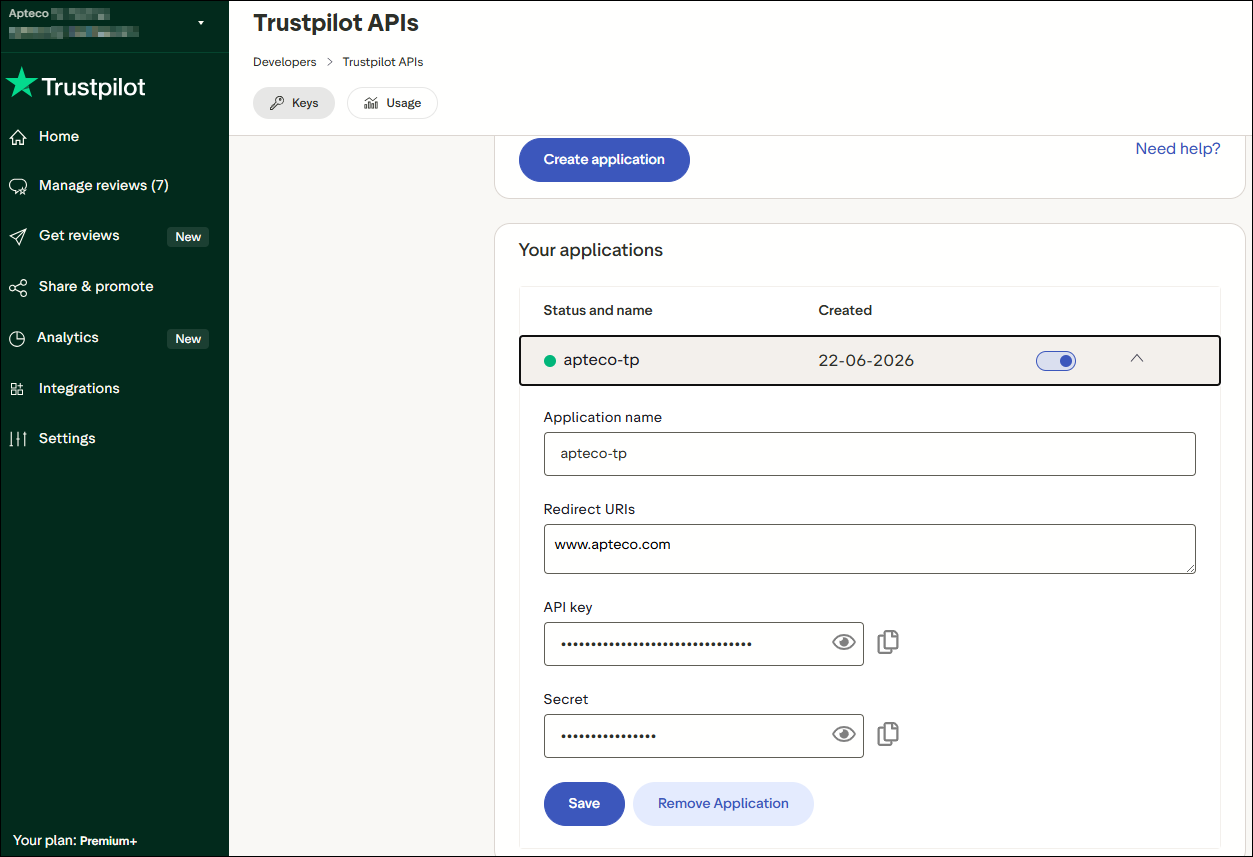
Under Your applications, find your application and select the drop-down arrow to reveal its API key and Secret.
-
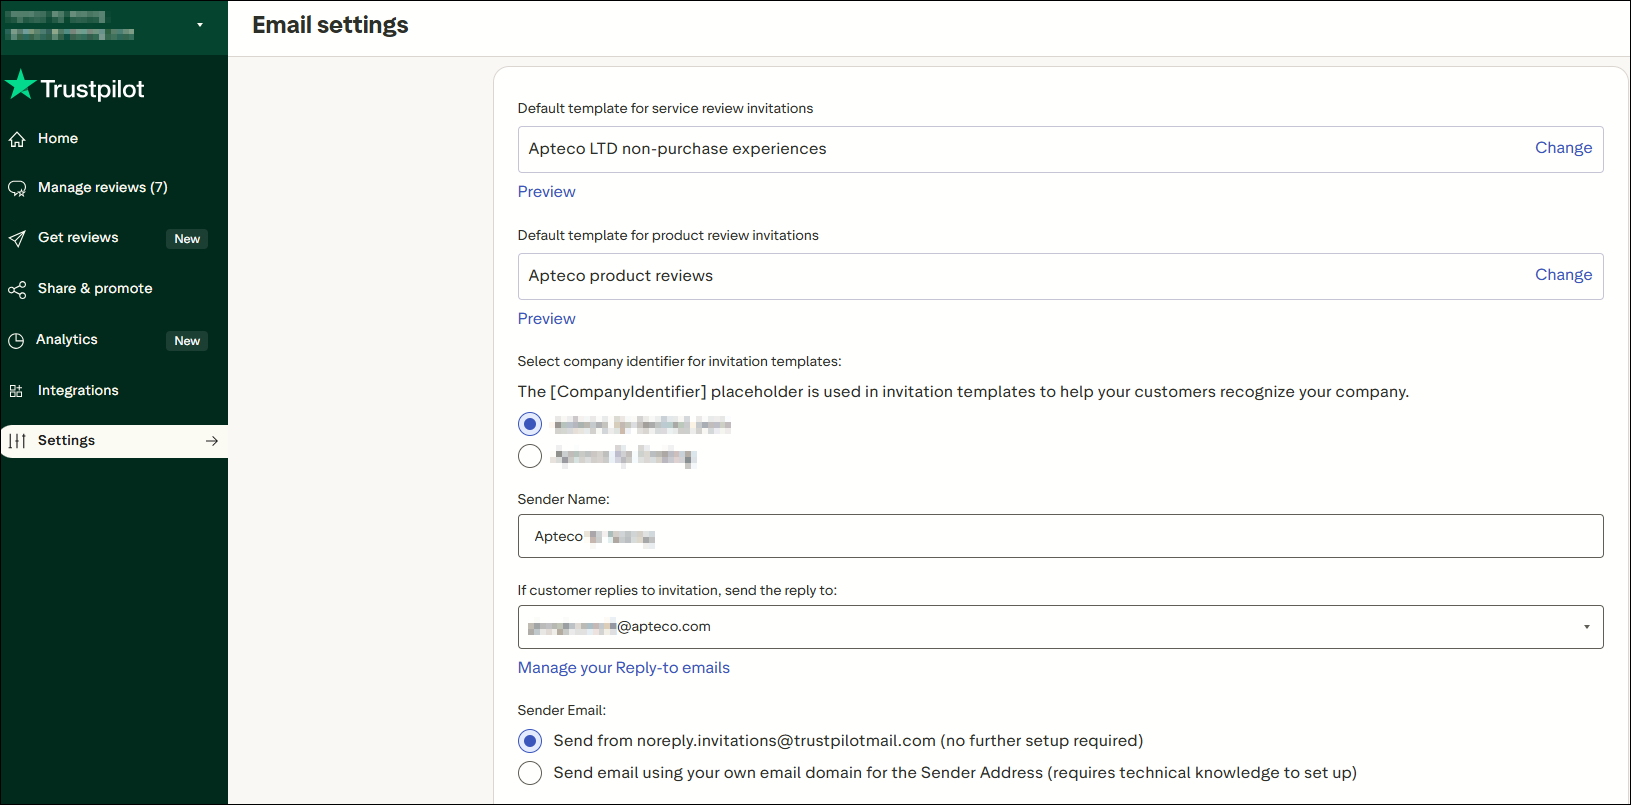
Go to Settings > Email Settings to find your Sender Name and Redirect Link.
Setting the parameters
Open the Parameters tab.
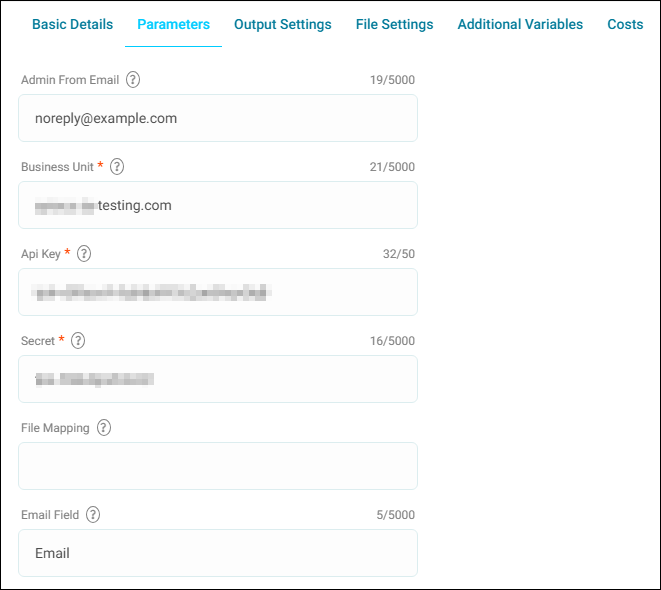
To configure your Trustpilot authentication:
- Set Business Unit to your Trustpilot Business Unit name.
- Set Api Key and Secret to the values from your Trustpilot application.
- Set Email Field to
Email.
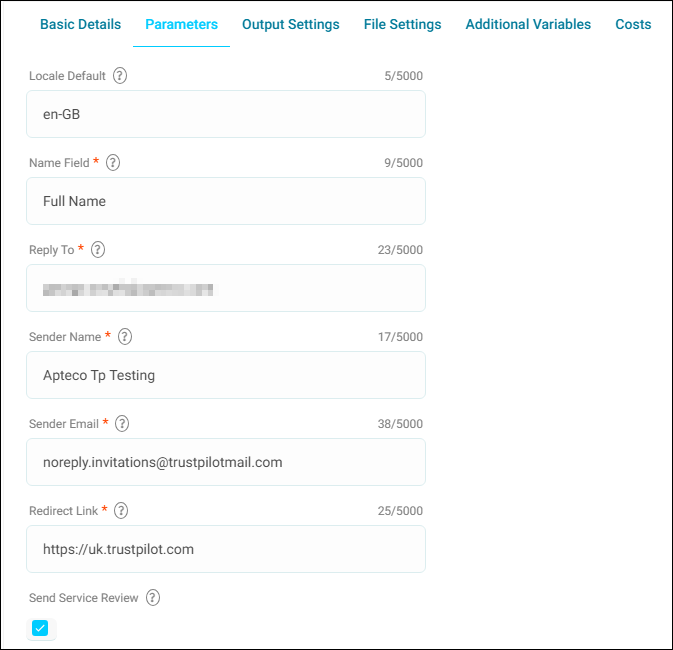
To configure the remaining parameters:
- Optionally, set Locale Default to your audience's locale, for example
en-GB. -
Set Name Field to the personalisation field you'll use for the customer's name.
Tip
This value must match a content field you add to the campaign later, so pick something clear and consistent, for example
Full Name. -
In Reply To, enter the owner email address of your Trustpilot application.
- Set Sender Name to your Trustpilot application name.
- Set Sender Email. Trustpilot's generic sending address,
noreply.invitations@trustpilotmail.com, works for most accounts. - Set Redirect Link to the redirect URL from Trustpilot.
- Select Send Service Review.
-
Optionally, select Send Product Review to also send Product Review invitations from this channel. This reveals two more fields:
- Product Name Field: The personalisation field that holds the product name, for example
Name. - Product Name Default: Fallback text to use if that field is empty, for example
Product.
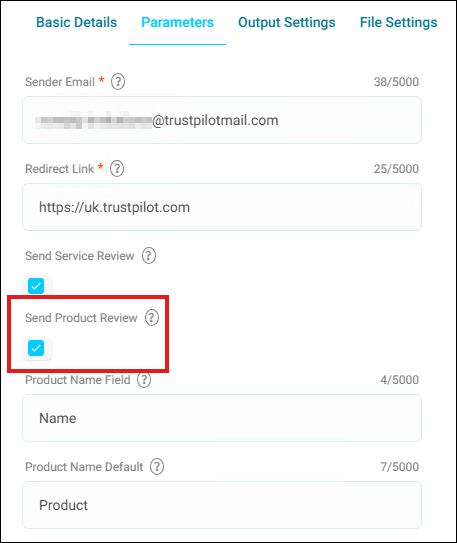
- Product Name Field: The personalisation field that holds the product name, for example
Your Trustpilot channel is ready to use in a campaign.
Sending a Service Review or Product Review campaign
Set up a Service Review or Product Review campaign the same way as any other Orbit email campaign, with two differences: the channel you choose at the message step, and how you set up personalisation.
To send a campaign:
- Set up your audience as you would for any other campaign.
- At the message step, choose your Trustpilot channel from the Email Channel drop-down list.
-
Choose your template from the Email Template drop-down list. If you selected Send Product Review on the channel, your Product Review templates also appear in this list alongside your Service Review templates.
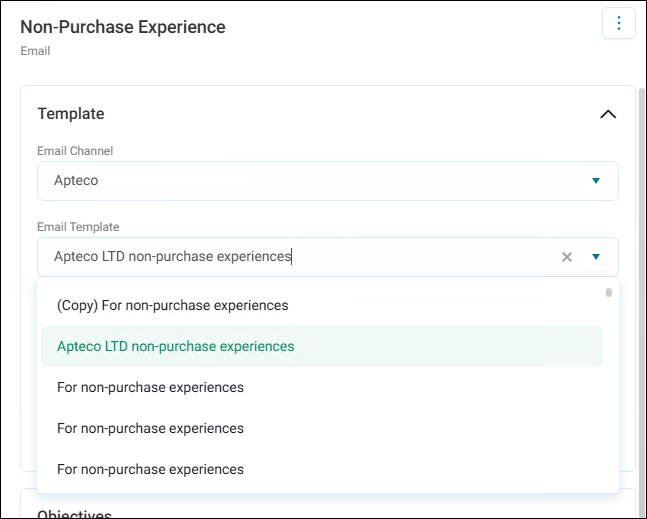
-
Under Personalisation, select + Add Content Field and give it the same name as the channel's Name Field. Then add the variable that holds the customer's name, for example
Forename. See Message personalisation.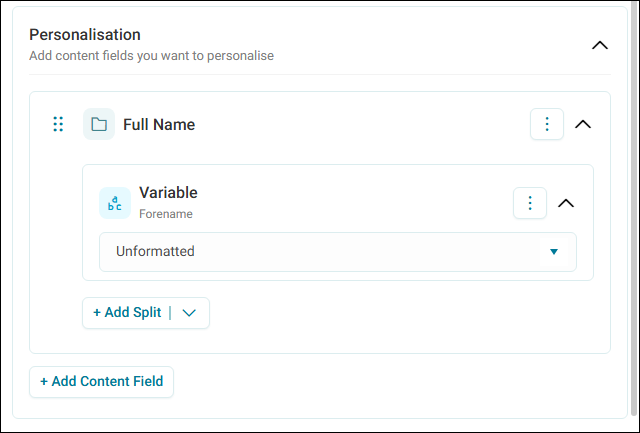
-
Select Apply.
- Set a schedule and run the campaign.
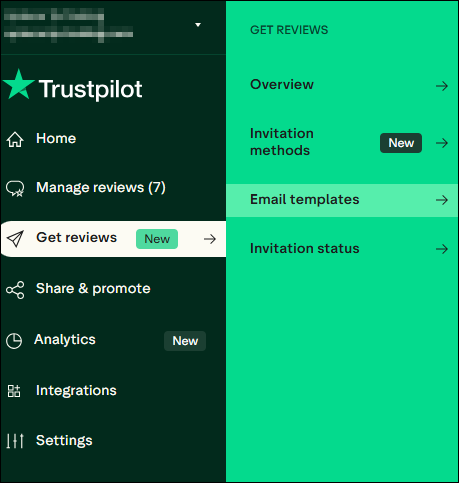
You can check or manage your templates directly in Trustpilot, under Get reviews > Email templates.
Note
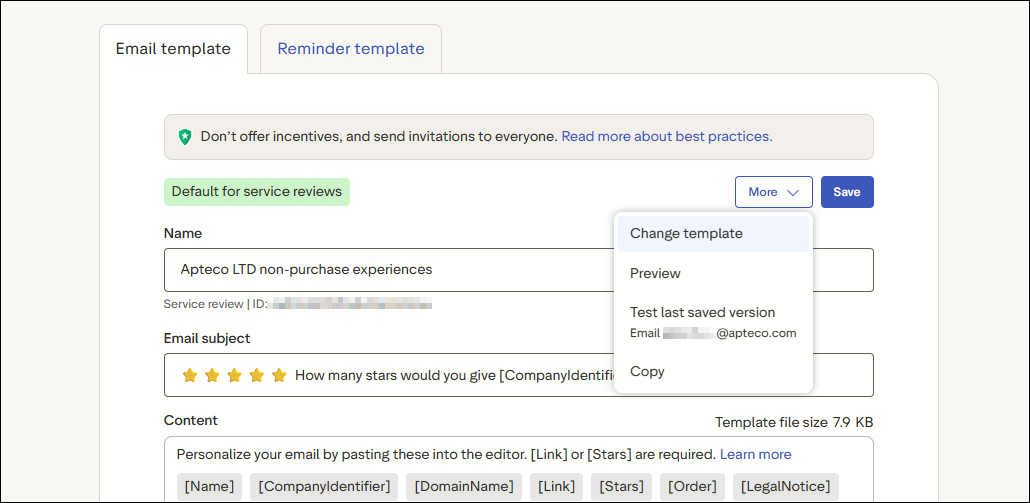
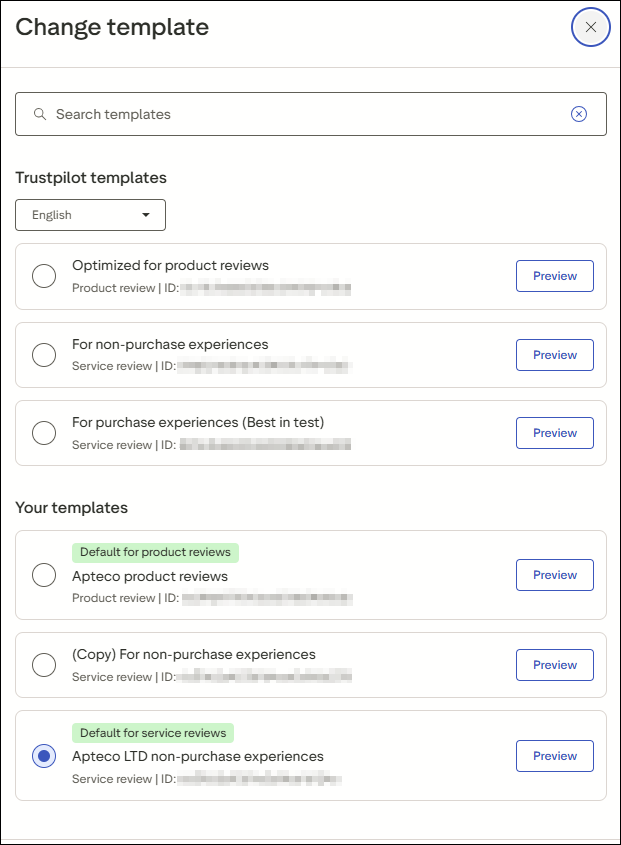
In Trustpilot, Email templates opens your default template. To see every template, select More > Change template.
The list shows every template in your Trustpilot account, and whether each is a Service Review or Product Review template.
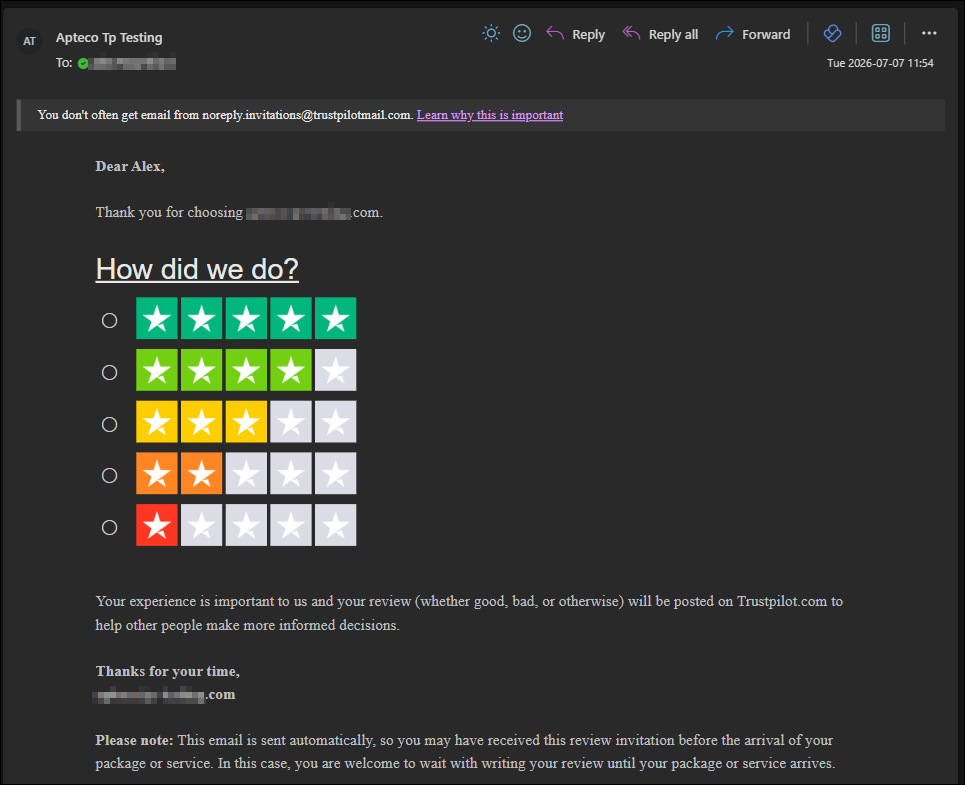
Once the campaign runs, the customer receives an email similar to this, with a star-rating widget that links back to your Trustpilot review page:
Receiving Trustpilot responses
Use the FastStats Email Response Gatherer (FERG) to automatically pull completed review responses from Trustpilot into your Response database, so you can report on review activity alongside the rest of your customer data.
Note
This is a separate, scheduled process from sending invitations. It needs access to the FERG utility, and to your Response and PeopleStage databases.
Configuring the response gatherer
To configure the response gatherer for Trustpilot:
- Download the DigitalIntegrations.zip file from the Apteco Portal and install the FastStats Email Response Gatherer (FERG), if you haven't already.
- Open the FastStats Email Response Gatherer Configurator (
EmailResponseConfig.exe). -
Under Database, set:
- Connection string: Your Response database connection string
- Bulk insert folder: The folder FastStats uses for bulk inserts
- Send Email on Error: Select this and configure SMTP Properties to email administrators if a retrieval fails
- Use BCP: Select this option
- PeopleStage connection string: Your PeopleStage database connection string
- Under Email Broadcaster, set Broadcaster to TrustPilot.
- Enter any value in Username and Password.
Note
As with your Trustpilot channel setup, these values aren't used for authentication. A space or a full stop works.
-
Add the following Broadcast Parameters:
Parameter Value APIKEY Your Trustpilot application's API key SECRET Your Trustpilot application's secret BUSINESSUNIT Your Trustpilot Business Unit name MESSAGEPERIOD How far back to check for responses, for example 7Dfor seven daysUSEINTEGRATIONMANAGER false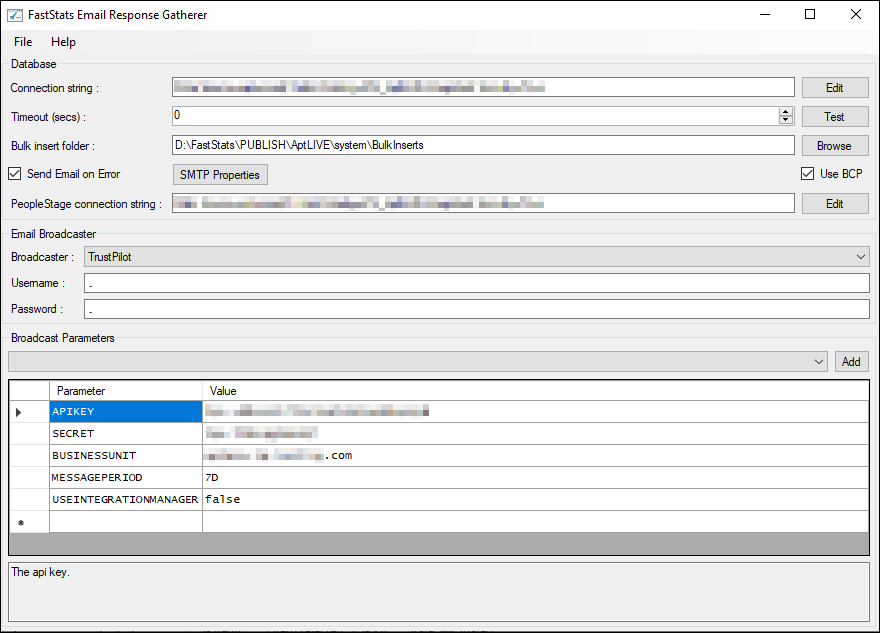
-
Save the configuration as an XML file, in a folder you'll also use to store logs, for example
D:\FastStats\FERG. Your batch file refers to this file. See Creating the batch file.
Automating retrieval
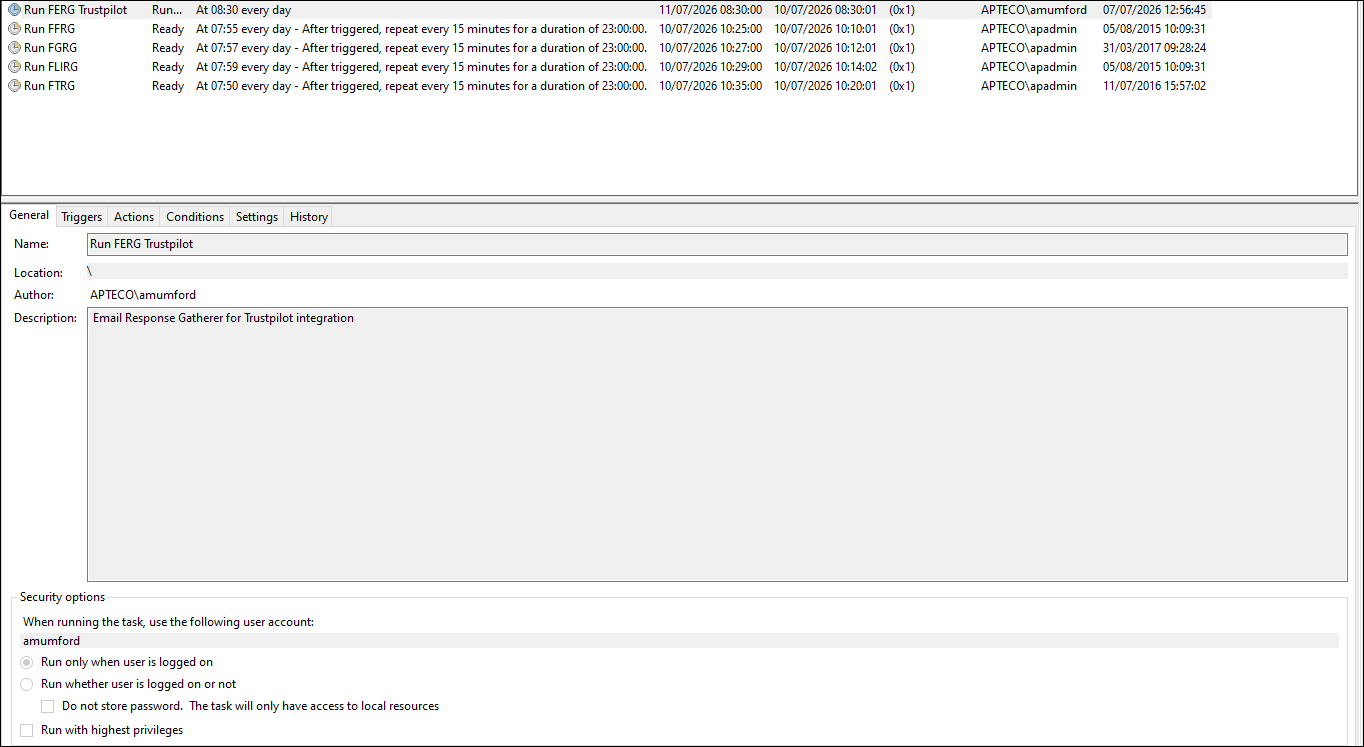
To run the Response Gatherer automatically, create a batch file that runs it, then schedule that file with Windows Task Scheduler.
Creating the batch file
Create a batch file to run the Response Gatherer. For example:
REM - Trustpilot Response Integration

@echo off
D:
cd D:\FastStats\FERG
cls

SET FERG="%ProgramFiles%\Apteco\FastStats Email Response Gatherer x64\EmailResponseGatherer64.exe"
SET LOGFILE="Logs\Trustpilot.txt"
SET LOGFILEDETAILS="Logs\Trustpilot_Details.txt"

echo( >> %LOGFILE%
echo( >> %LOGFILEDETAILS%
echo %date% %time% - Starting FastStats Trustpilot Response Download >> %LOGFILE%
echo %date% %time% - Starting FastStats Trustpilot Response Download >> %LOGFILEDETAILS%
echo( >> %LOGFILE%
echo( >> %LOGFILEDETAILS%

%FERG% Trustpilot.xml >> %LOGFILEDETAILS%

IF ERRORLEVEL 9003 goto FailedException
IF ERRORLEVEL 9002 goto FailedLogout
IF ERRORLEVEL 9001 goto FailedDownload
IF ERRORLEVEL 9000 goto FailedLogin

:OK
echo %date% %time% - FastStats Gathered Trustpilot Responses OK >> %LOGFILE%
goto Complete

:FailedLogin
echo %date% %time% - FastStats Gatherer Failed - Login Failed to Trustpilot>> %LOGFILE%
goto Complete

:FailedDownload
echo %date% %time% - FastStats Gatherer Failed - Downloading from Trustpilot>> %LOGFILE%
goto Complete

:FailedLogout
echo %date% %time% - FastStats Gatherer Failed - Logging out of Trustpilot>> %LOGFILE%
goto Complete

:FailedException
echo %date% %time% - FastStats Gatherer Failed - Trustpilot API Exception >> %LOGFILE%
goto Complete

:Complete
echo %date% %time% - Completed FastStats Trustpilot Response Download >> %LOGFILE%
Tip
Update the cd line to match wherever you saved your Response Gatherer configuration and XML file. It doesn't need to match the example.
Scheduling the batch file
Use Windows Task Scheduler to run your batch file automatically:
-
Create a new task, and give it a name and description.
-
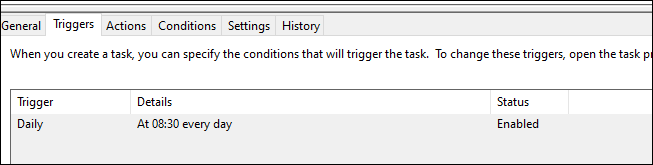
On the Triggers tab, set a schedule for how often the task should run, for example daily at a specific time.
-
On the Actions tab, set the action to Start a program, and point it at your batch file.
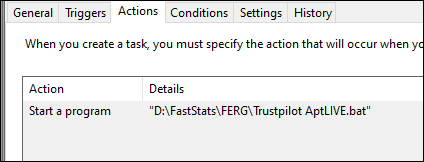
The task now runs automatically at the times you've scheduled.
Checking the response log
Each time the batch file runs, it writes to a log file (Trustpilot_Details.txt in the example batch file) recording what happened, including how many records were retrieved:
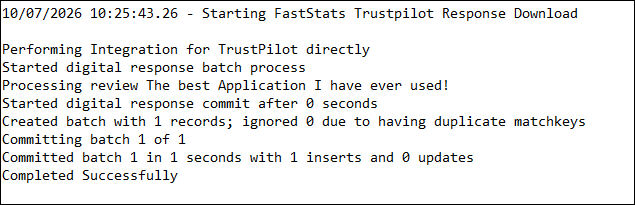
Viewing your response data
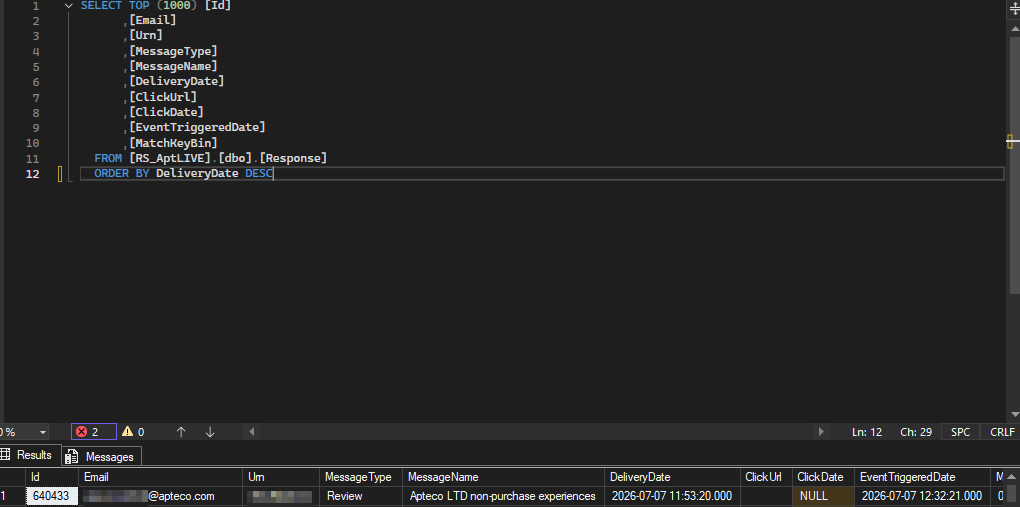
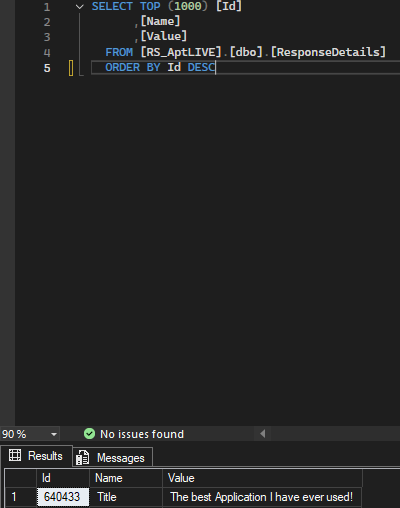
Retrieved response data is stored across two tables in your Response database: Response and ResponseDetails.
The Response table stores one row per response, including the email address, delivery date, and click date:
The ResponseDetails table stores the review content, such as the star rating and review title:
Parameters reference
| Field | Value | Where to find it |
|---|---|---|
| Business Unit | Your Trustpilot Business Unit name | Top of the left-hand navigation in Trustpilot |
| Api Key | Your application's API key | Trustpilot: Integrations > Developers > APIs > Your applications |
| Secret | Your application's secret | Trustpilot: Integrations > Developers > APIs > Your applications |
| Email Field | Email |
|
| Locale Default | Your audience's locale, for example en-GB |
|
| Name Field | The personalisation field name used in your campaigns | Must match the campaign's content field name |
| Reply To | The owner email address of your Trustpilot application | Trustpilot: Settings > Email Settings |
| Sender Name | Your Trustpilot application name | Trustpilot: Integrations > Developers > APIs, or Settings > Email Settings |
| Sender Email | Trustpilot's generic sending address | noreply.invitations@trustpilotmail.com |
| Redirect Link | Your Trustpilot redirect URL | Trustpilot: Settings > Email Settings |
| Send Service Review | Selected | |
| Send Product Review | Optional. Select to also send Product Review invitations | |
| Product Name Field | The personalisation field that holds the product name | Must match the campaign's content field name |
| Product Name Default | Fallback text used if the product name field is empty |